Unfortunately, using:
[UIDevice currentDevice].model
did not do precisely what I needed to do. I needed something specialized. I wanted to add new functionality to the UIDevice class as if it had been there all along.
Looking for Solutions
A few months back I ran into a code sample that adds functionality to the NSDate class called NSDate+Helper. This class, created by a programmer named Billy Gray was my first exposure to a wonderful feature built into Objective C called Class Categories. When I saw how one could do this, it set the wheels turning in my mind at all the possibilities!
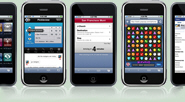
In this tutorial I am going to show you how to use class categories, and for our example we are going to add functionality to the UIDevice class for use in ultimately creating a sample Universal App.
Note: The tutorial video appears below. If you are reading this post from a feed that does not support showing the embedded video click here to jump directly to this post on iPhone Obsessed.
note that the above video contents are easier to see in full screen mode.
Sample Code Info:
Getting Sample Project Source Code & Running it in the Simulator
It would be handy for you to download a copy of our Universal App project to look over and try out. In order to really use it you will need to have an Intel-based Mac computer, and XCode 3.2 or better installed on it. Once you have done this, you will be able to run it in the iPhone Simulator.
Make sure when running on the simulator that you set the proper build version before doing a build:
Simulating the app running on an iPhone:

Simulating the app running on an iPad:

Running the Sample Project on an Actual Device
If you want to run the project on an actual device rather than just the simulator, you will need to be a paying member of the Apple Developer Network ($99 a year at the time of this post). And you will need to have gone through the hoops of setting up your certificates, app record, and provisioning. ... We are not covering any of this getting on the device stuff in this tutorial.
At least you can run the project in the iPhone Simulator for free!
Getting In Class Categories
What is a Class Category?
- You use class categories to add new functionality to an existing class. This could be one of your own classes, or it could be a class in Apple or someone else's API.
- You do not have to sub-class the class you are adding to.
- You can add the new functionality in such a way (inside your project) that it seems that the functionality was there all along!
Step 1: Come Up With A Category Name
When creating a class category you are adding some sort of new functionality to an existing class (without touching any of the code actually in the existing class)! If you were to describe in a general way what that new functionality was, how would you phrase it? What "category" would it fall under? This is something you make up. I make up some sort of camel-cased phrase for my category name. In the case of my new functionality to add to UIDevice, I thought that MyDeviceType captured it well. Perhaps if I had thought about it longer I could have made up something better! But that is what I came up with so that is what I used!
Step 2: Create a Group in Our Project to Place our Class Category in (optional)
The first thing you may want to do is create a new group (folder in your project) to place it in. This is optional, but it can make finding it easier as well as providing some form of internal documentation.
So, for the sake of argument, let's say that this is what you want to do. Let's go through the steps needed to do this:
- First of all click on your project file item (in examples shown in the screen shots, this is "classcat").
- Then control-click on it again to bring up a pop-up menu.
- Click the Add option at the top of the menu...
- Then click the New Group option (see screen shot below)

At this point you will see a new group appear under classcat with the text highlighted and ready for you to edit like in the screen shot below:

Lets rename the group to "Class Categories"...

Step 3: Create a new Class from the NSObject Class
- Control-click on our Class Categories group to bring up the pop-up menu.
- Pick the Add option.
- Pick the New File... option.

- The New File dialog window will appear.
- Make sure that Cocoa Touch Class is highlighted on the left hand side.
- Make sure the Objective-C class option is selected.
- Make sure Subclass of is set to NSObject.
- Then click the Next button.

The next screen will come up. It is looking for you to name the class:

We need to enter our class name. Gotta have some sorta naming convention! We will use the name of the original class we are creating a category for followed by the name of the category itself. That sounds good! So the original class in our example is UIDevice. The name of our class category is going to be: MyDeviceType. So we will type in UIDeviceMyDeviceType.

Above I type in my new class name. Then I would just click the blue Finish button.
Here is the initial header file XCode created:
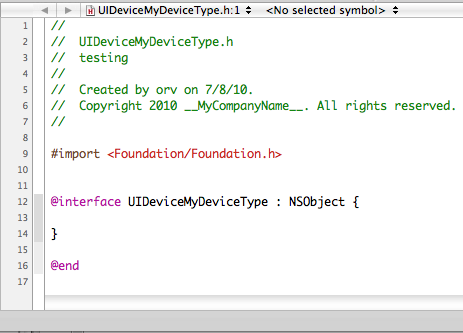
This file starts out as just a normal class being subclassed from a superclass (NSObject).
Step 4: Modify Our New Class Files and Turn them Into a Class Category
The first thing we will do here is replace the class name UIDeviceMyDeviceType with the class name we are creating a category for. In this case that is UIDevice.
Next we are going to put MyDeviceType in parenthesis and delete the colon, NSObject and the curly braces and end up with this:
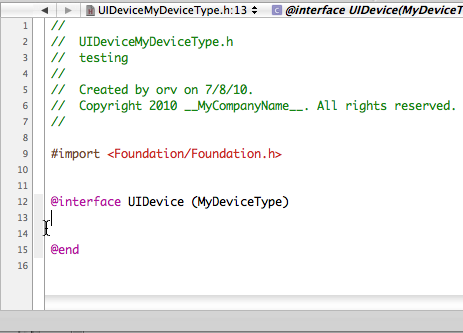
- Again note that above UIDevice is the existing class we are creating a category for.
- MyDeviceType is the category name we made up for our category.
- The category name is in parenthesis.
- Although it might seem that we should put the category name in quotes... we do not.
- Again, we removed the normally correct curly braces... to leave them in on our class category will get you errors when you build your project.
While we are at it, lets add some interface definitions for the methods in our class category that we want to make public:

There may be other members in our class category than these, but these are available to be used by the "outside world."
Now let's look at the implementation file (the .m file)...
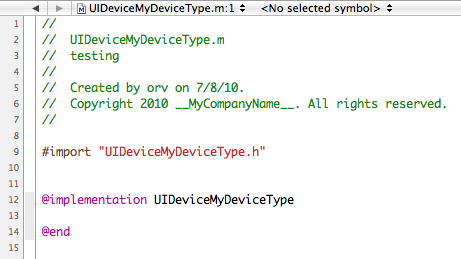
Notice it has the class name we gave originally. After the text UIDevice, we need to put parenthesis around MyDeviceType... Again, no quotes go around the class category name.

There! It is now setup to be used as a class category! All that remains to be done is add any variable declarations and code for our members.
Here is a screen shot showing a partial view of what that could look like:

To see an actual working example download the Universal App sample code I have provided.
Step 5: Use New Functionality in Your Project!
The new functionality at this point is ready to be used. There are two ways to make it accessible to various classes in your project:
1. In the implementation file of a class that is going to use this functionality, add an #import line at the top. In our case the line would be:
#import "UIDeviceMyDeviceType.h"
2. If you are going to use it widely in your project there is a better way!
Click in the Other Sources group in the project and click on the classcat_Prefix.pch file.
(the first part of the file name is the project name).

You will see two import lines defined for Apple framework stuff. XCode puts these in so that the programmer does not have to use #import for anything in these frameworks throughout the project... the #import is implied. Underneath the #import add our import statement:
#import "UIDeviceMyDeviceType.h"

Save your changes and BOOM! All your new functionality in your new class category is available to project!
You could say:
NSString *myDev = [UIDevice myDeviceType];
in your code anywhere in your project and the new myDeviceType method will just work!
Different Uses for Class Categories
Here are some possibilities to think about:
- Add new functionality to existing classes (especially API type stuff) like we did in this tutorial.
- Break a large class up into separate files grouping various blocks by function "category."
- Can you think of anything else? :)
Hope you find this tutorial useful. Any questions? Ask away. If you could rate my Youtube video that would be great too!
In the next tutorial we will be talking about the structure of a Universal App.